Thursday, September 15, 2011

CINNAMON RAISIN SWIRL BREAD

Time to up the culinary game.  How you ask?

Yeast.

That's right, no banana quick bread here; I brought out the big guns (well, more like the unicellular).  Sure, it doesn't go from bowl to belly in less than an hour. Sure, you're working with a fickle, living, breathing organism. But nothing makes a house smell more cozy and inviting than fresh baked bread (close second: roast chicken or roaring fire). Tossing in raisins and cinnamon just ups the comfort level by a factor of 10!

Fresh out of the oven, this loaf is killer. Toasted with butter - whole new experience. Home made is so much heartier than those flimsy Pepperidge Farms slices you buy at Costco. Make it yourself and you can saw off giant slabs, unraveling the fluffy goodness from the napkin on your lap. Getting out a plate is wasted effort because this won't be eaten at a leisurely pace. 

But be warned: this bread disappears fast. I had grand plans for Saturday morning french toast, but little did I know this bad boy would only survive a couple of days on the counter of a busy kitchen. Oh well, guess I'll have to make it again!  


CINNAMON RAISIN SWIRL BREAD
(Adapted from Dorie Greenspan's Raisin Swirl Bread)

INGREDIENTS:
For The Bread - 
1 packet active dry yeast
1/4 cup sugar, plus a pinch
1 and 1/4 cups just-warm-to-the-touch whole milk
3/4 tsp salt
1 large egg
1/4 tsp vanilla extract
Grated zest of 1/2 and orange
Pinch of fresh nutmeg
3 and 3/4 to 4 cups flour
For The Swirl - 
1 tablespoon sugar
2 tsp cinnamon (I made mine heaping)
2 tsp unsweetened cocoa (this is optional, I added only 1/2 tsp)
1 cup moist, plump raisins 
3 Tbl unsalted butter, softened to spreadable consistency

DIRECTIONS:
Make the Bread -
Put yeast in small bowl, toss in the pinch of sugar and stir in 1/4 cup of warm milk.  Let rest for 3 minutes, then stir.
With a stand mixer fitted with paddle attachment, combine remaining 1 cup milk, the butter and remaining 1/4 cup sugar.  Mix on low speed for a minute or two.  Add the salt, egg, vanilla, orange zest and nutmeg and mix for a minute; mixture will look curdled.  Add the yeast and beat on low speed for 1 minute more.
Turn the mixer off and add 2 and 3/4 cups of the flour, mix on low until you work the flour into the liquids.  Now is the time to switch to the dough hook attachment.  Add another cup of flour and increase speed to medium, beating dough for a couple of minutes.  If the dough does not come together and clean the sides of the bowl, add an additional 1/4 cup of flour, 1 Tbs at a time. Keep the mixer at medium speed and kneed the dough for 3 minutes, or until dough is smooth and has a nice buttery sheen.  The dough will be very soft, much too soft to knead by hand. 
Butter a large bowl, turn the dough into bowl and cover tightly with plastic wrap. Put the bowl in a warm place and let the dough rise until doubled in size, about 1.5 hrs.  
Scrape the dough onto a large piece of plastic wrap, wrap it and but in freezer for 30 minutes to firm enough to be rolled easily (I instead refrigerated the dough overnight because there was not enough time for the second rise and baking ... also it meant fresh bread for brunch!)
Shape the Loaf - 
Butter a 9x5 inch loaf pan.
Whisk together sugar, cinnamon and cocoa. 
Roll dough into a 12x18 inch rectangle on a lightly dusted surface.
Gently smear 2 Tbs of butter over the surface of the dough with your fingers. Sprinkle over cinnamon sugar mixture then scatter the raisins over the surface.  Starting from short side, roll the dough up jelly-roll fashion, making sure it is nice and snug.  Fit dough into buttered pan, seam side down, and tuck ends under loaf. 
Cover pan loosely with wax paper and set in warm place; let dough rise until it comes just a little above the edge of the pan, about 45 minutes.
Bake the Bread -
When dough has almost fully risen, center rack in oven and preheat to 375 degrees F. Line baking sheet with parchment.  Melt remaining tablespoon of butter and brush on the top of the loaf. Put the pan on baking sheet and bake bread for 20 minutes.  Cover loosely with foil tent and bake for another 25 minutes or so, until the bread is golden and sounds hollow when the bottom of the pan in tapped.  Transfer the pan to rack and cool for 5 minutes, then unmold. Invert the bread and cool to room temperature right side up on rack. 


Friday, September 9, 2011

BLUEBERRY MUFFINS

Good Morning! I don't know about you but sometimes I am craving something more than a bowl of cereal or some eggs. As these brisk mornings approach I want something satisfying and hot out of the oven. What better than a warm homemade blueberry muffin. I've struggled to find a decent recipe for your basic blueberry muffin. Alas, I stumbled upon one on the world wide web. It was, however, missing what I find to be some of the key ingredients in a muffin. Spices! After a few tweaks this recipe is ready for all those brisk mornings and a hot cup of coffee. Enjoy!


The Best Blueberry Muffins
(Adapted from food.com)

Servings: 18

Ingredients:
1/2 cup of room temperature butter
1 cup granulated sugar
2 large eggs
1 teaspoon vanilla
2 teaspoons baking powder
1/4 tsp salt
1 tsp cinnamon
a pinch of nutmeg
2 1/2 cups fresh or frozen blueberries
2 cups all purpose flour
1/2 cup milk

For Topping:
2 tbsp sugar
1 tbsp cinnamon
a pinch of nutmeg

Directions:
Heat the oven to 375 degrees. Grease a 12 cup muffin tin. In a bowl, mix butter until creamy. Then add sugar and mix until fluffy and pale. Add eggs one at a time, beating after each. Then mix in vanilla, baking powder, salt, cinnamon, and nutmeg. With a spoon, fold in half of the flour then half of the milk into the batter, repeat. Fold in the blueberries. Then distribute the batter into the 12 muffin cups. You may have extra batter. Top each muffin with the topping. Bake 20 to 30 minutes until golden brown and springy to the touch. Add a little butter and enjoy!

This recipe makes 18 servings and most people only have a single 12 cup muffin tin. I decided to experiment with my extra batter and found another fun way to bake these muffins up to make them extra special. I baked the extra batter in single serving ramekins and added old fashioned rolled oats with a little bit of butter to the topping before baking. The presentation looks great and it tastes amazing!

AUTUMN IS UPON US...

While out and about last weekend I couldn't help but notice my first foliage siting of the season. A lone birch had transformed its vibrant greens into warm hues of orange and red. That's right, the trees have officially begun changing in New England. As the day went on, while driving up Route 93, I had even noticed a few more. Below was the first tree I had sighted and I needed to share it with you. Autumn is upon us. Get those apple picking, pumpkin carving, trick-or-treating, turkey carving hands ready!
I hope this gets you excited for fall!


100 YEARS OF STYLE IN 100 SECONDS

In honor of Fashion Week ... enjoy!


Thursday, September 1, 2011

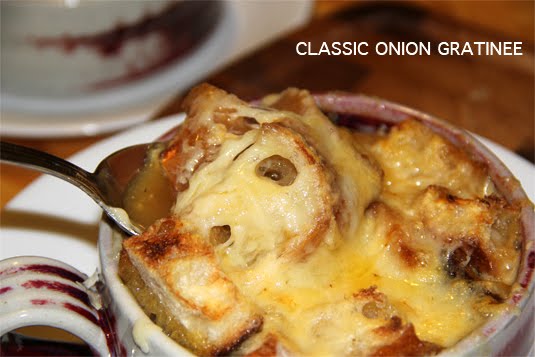
CLASSIC ONION GRATINEE

As Mere was baking while waiting for Irene, I was spending time with my Mom. She came up to visit for the weekend and to help me prep for the Hurricane. As we hunkered down inside the house that Sunday I whipped out some good storm soup from the freezer. I had frozen a batch of Classic Onion Gratinee soup and figured what is better on a windy and rainy day. All it needed was a little heat, some hearty bread, and gooey cheese. Mom and I actually came across this recipe last summer at Cafe Noir which was located in Providence, Rhode Island. I say was because they have apparently gone out of business since then. Luckily they gave us their soup recipe!


The recipe is good as is but I have found ways to make it a little more flavorful and easier to eat. I add an additional onion, garlic clove, and thyme sprig, the onion adds heartiness, the thyme and garlic add more flavor. I have also found it is easier to use cubed bread in the soup which makes it easier to eat with your spoon. Last but not least, I shred the cheese so it fills every nook and cranny. It also melts better.

The recipe is supposed to serve 6; but I find it serves about 8. It really depends on how large your bowls and tummies are. Enjoy!

Classic Onion Gratinee
(Courtesy of Cafe Noir)

Ingredients
:
2 Large Spanish Onions
4 Ounces Unsalted Butter
1 Clove Garlic Minced
2 Cups Dry White Wine
3 Sprigs of Thyme
2 Quarts Chicken Stock
Salt & Pepper to Taste
6 Slices Toasted French Bread
of Good Gruyere Cheese

Julienne onions, sweat them in butter over medium heat until wilted and translucent, about 10 minutes. Add garlic, turn heat to high to caramelize onions. Stir constantly to avoid burning. When onions achieve good color, deglaze pot with wine and cook for about 1 minute. Add chicken stock and thyme sprig bouquet. Season lightly, simmer for about 15 minutes. Remove thyme and season soup to finish. Ladle soup into over proof bowls. Place 1 slice of bread atop each soup and cover with 2 slices of gruyere cheese. Place soup bowls under broiler for about 3 minutes or until the cheese is bubbly and beginning to brown. Enjoy carefully, bowls will be very hot!

Monday, August 29, 2011

PEANUT BRITTLE and VANILLA ICE CREAM

As I awaited Irene's overnight visit this Saturday, I decided to keep myself busy with a new challenge - Peanut Brittle.  Considering my candy thermometer is tucked away in a storage facility I am not sure why I thought this was in intelligent time to venture into the world of sugar boiling, but miraculously I was able to gauge the appropriate time and temperature with the help a meat thermometer (please note the thermometer's highest temperature was 75 degrees colder than the maximum temperature suggested in the recipe, plus I halved the recipe so all times were significantly shortened - there was some serious guess work going on).  One part estimation to two parts dumb luck seems the perfect recipe for success... next time I'll unpack my thermometer to be safe though.

{Old Fashioned Peanut Brittle recipe from Bon Appetit - via epicurious.com}

But I didn't stop there. What would go well with the crispy, salty-sweet treat? Cold and creamy vanilla ice cream of course! I made a basic custard compliments of David Lebowitz, froze the concoction and voila, a perfect post hurricane dessert for Sunday.

{Recipe from David Lebovitz via www.epicurious.com}

Sunday, August 28, 2011

BANANA BUNDT

I don't know what it is about bananas, one day they're not ripe enough to enjoy then the next they're a spotted mess. I can't complain though because the surplus of blackened fruit makes for whole host of baking opportunities. Last week's crop of past-prime bananas ended up in this basic Banana Bundt Cake. No fancy icing, chocolate chips or lemon zest, this recipe made sure that the banana flavor was front and center, the texture was a nice tight crumb and each slice was light and super moist.  I may have added the chopped pecans as a little surprise but this recipe needed no helping. My search for the perfect banana bread, one with big flavor but not as heavy as a brick, may be a wasted effort because this banana cake blows any bread I've had out of the water. Perfect for brunch or late night with a cup of tea, next time your fruit bowl is burdened with stinky, black bananas this is a must bake - trust me.


CLASSIC BANANA BUNDT CAKE
(Adapted from Dorie Greenspan's Baking)

Ingredients:
3 cups all-purpose flour
2 tsp. baking soda
1/2 tsp. salt
2 sticks (8 oz) unsalted butter, room temperature
2 cups sugar
2 tsp. pure vanilla extract
2 large eggs, room temperature
About 4 ripe bananas, mashed (about 1 and 1/2 to 1 and 3/4 cups)
1 cup sour cream or plain yogurt (I used greek style yogurt)
optional - 1 cup chopped nuts (I used pecans but walnuts would be delicious too!)


Directions:
Center rack in oven and preheat to 350 degrees F.  Grease a standard 12-cup bundt pan.

Whisk flour, baking soda and salt together, set aside.

With stand mixer or hand mixer, beat butter in a large bowl until creamy.  Add the sugar and beat on medium speed until light and fluffy. Beat in vanilla, then add the eggs one at a time, beating about 1 minute after each egg. Reduce the mixer speed to low and mix in the bananas.  Finally, mix in half of the dry ingredients (batter may look curdled), and all of the yogurt, then the rest of the flour mixture.  This is when you add the nuts if using.  Spoon the batter into the pan and rap on the counter to de-bubble and smooth the top.

Bake the bundt for 65-75 minutes or until a thin knife inserted deep into center come out clean.  Check the cake after 30 minutes - if it is browning too quickly cover loosely with a foil tent (I know my bundt needed the tent, I would suggest doing so as well).  Transfer cake to rack and cool for 10 minutes before unmolding.  Cool to room temperature.

Tip - wrap up cooled cake in plastic and wait a day before enjoying.  Time is this cake's friend, the flavors intensify and the inside gets super moist.